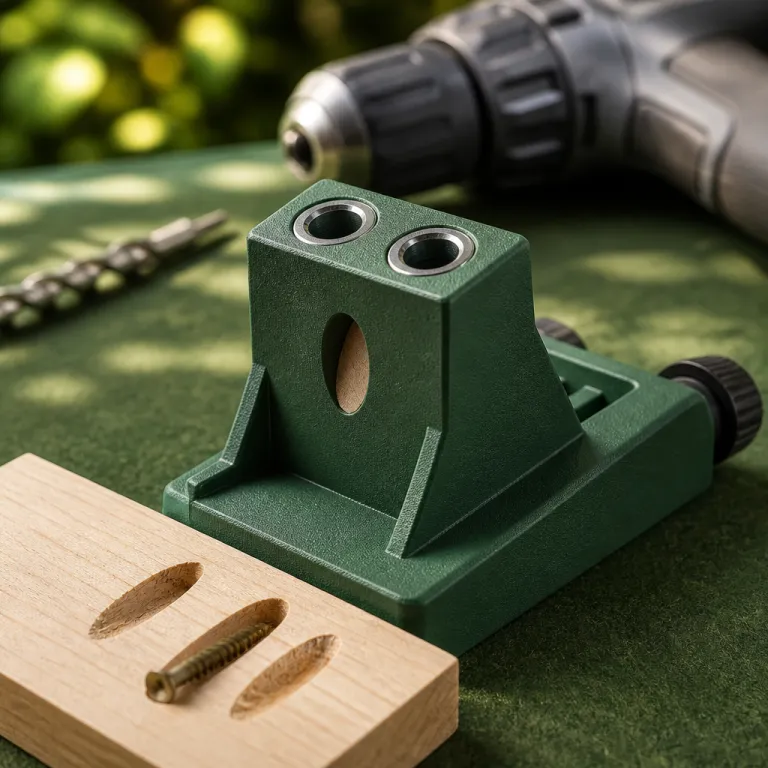
How pocket hole projects turn a cordless drill into a joinery workhorse
Pocket hole projects built with a cordless drill and a Kreg jig turn basic lumber into real furniture fast. When you pair a reliable drill, a sharp stepped bit, and a simple pocket hole jig, you get strong screw joinery that hides the pockets on the inside faces of your wood. This combination of a compact recess, a guided drill sleeve, and purpose made pocket screws lets a first time DIY woodworker build sturdy projects that actually last.
The core idea behind every pocket hole build is simple and easy to repeat. You clamp a Kreg jig or similar pocket hole tool to your board, use the built in drill guide to bore angled holes with a stepped drill bit, then drive special self tapping screws to pull the boards tight. Because the pockets sit on the hidden faces of the wood, your table, bench, or shelf looks clean while the concealed screw joinery quietly does the structural work.
For most DIY pocket hole furniture and shelving, a 12 volt or 18 volt battery drill with a half inch (13 mm) chuck is enough. A compact drill with a smooth clutch protects the pocket screws from stripping, while a second battery keeps you moving through longer projects. If your cordless drill set has hammer mode or an aggressive marketing label, leave those features off for pocket holes and focus instead on low speed control and consistent torque.
Think of the Kreg Jig 320 or 520 Pro as a precision drilling guide that upgrades any mid range cordless drill into a pocket joinery system. The pro style depth collar on the bit sets the exact pocket depth, and the bright blue plastic body on many Kreg tools makes them easy to spot on a crowded workbench. With a little practice on scrap wood, you will learn how different drill speeds, clutch settings, and screw lengths affect the strength of your joints in both softwood and plywood.
The Kreg 320 is a compact, clamp on jig suited to short runs of holes on boards and shelves, while the 520 Pro adds a built in clamp and faster adjustments that help on larger assemblies like tables and benches. Both use the same stepped drill bit and pocket screws, so you can start with the smaller jig and upgrade later without replacing your cordless drill or accessories.
Every project in this guide follows the same clear pattern so you can plan confidently. You will see the skill level, the time estimate, the approximate material cost, and the specific drill bit and pocket screws required for each build. That structure helps you compare ideas, choose the right cordless drill and Kreg jig combination for your weekend, and enjoy DIY independence without wasting money on the wrong tool or lumber.
Project 1 – floating wall shelves with clean pocket holes
Floating wall shelves are the fastest way to test a cordless drill and Kreg jig setup without risking expensive hardwood. For this build you need one cordless drill, a pocket hole jig such as the Kreg Jig 320, a square drive bit, pocket screws, and enough wood to form a simple U shaped shelf that hides the pockets against the wall. The only power tool required is your drill, so this project suits a beginner who wants an easy win and a clear guide to how pocket joinery feels in real wood.
Suggested layout diagram: Sketch a U shape on paper showing the top, bottom, and front face, then mark pocket holes along the inside edges of the bottom and front pieces. Use this as a reference while you work so you do not accidentally drill into a visible face.
Materials and cost stay modest for these shelves. Plan on one or two boards of 18 millimeter (3/4 inch) plywood or 19 by 140 millimeter (1 x 6 inch) pine, a small box of 32 millimeter (1 1/4 inch) Kreg pocket screws, and a handful of wall anchors, which usually keeps the total build cost between 20 and 40 dollars per shelf. A basic Kreg pocket jig kit with a drill guide, depth collar, and dust collection port is enough, and you can reuse the same stepped bit and battery powered drill for every shelf you add later.
Time and skill level favor the new DIY woodworker. Expect one to two hours from first cut to hanging the shelf, including layout, drilling the pockets, and driving the screws, and treat the first shelf as practice for your drill control. Keep your drill on low speed, set the clutch to a medium setting so you do not overdrive the screws, and always test your settings on a scrap pocket before committing to the visible shelf parts.
Build steps follow a logical sequence that you can repeat:
- Cut the top, bottom, and front face of the shelf to length.
- Use the Kreg jig to drill pocket holes along the inside edges of the bottom and front pieces, spacing the holes about 150 millimeters (6 inches) apart for strength.
- Clamp the parts, then drive 32 millimeter pocket screws with your drill and square drive bit to form the U shaped shelf.
- Mount the finished shelf to the wall using a simple cleat or two to four heavy duty screws driven into studs, depending on shelf length.
Because the shelf hides most pockets against the wall, this project is forgiving. You can experiment with different drill speeds, screw lengths, and even different brands of pocket screws without ruining the look of the finished shelf. Once you are comfortable, you can scale the same cordless drill and Kreg technique into longer shelves, corner units, or a full wall system that organizes a garage or office with minimal extra tools.
For DIYers who later want to compare pocket joinery with other methods, a dowel jig can be a useful companion tool, and resources that explain how a dowel jig transforms cordless drill set joinery for precise dowel joints will help you understand when each system shines. Pocket holes win for speed and easy alignment, while dowels can offer perfectly centered joints when visible edges matter. Having both options in your woodworking toolkit lets your cordless drill serve as a truly versatile joinery tool.
Project 2 – simple side table or nightstand using a Kreg jig
A small side table or nightstand is where a cordless drill and Kreg jig setup starts to feel like real furniture making. You are still working with basic wood and a single drill, but the project introduces legs, aprons, and a top panel that must stay square under daily use. The pocket hole jig acts as your drill guide, keeping every angled hole at the correct angle so the table pulls together tight when you drive the screws.
Suggested photo: Show the table frame upside down on a workbench, with pocket holes visible on the inside faces of the aprons and clamps holding the corners square before driving screws.
Materials and cost rise slightly but stay accessible for a first furniture build. Plan on four legs cut from 38 by 38 millimeter (1 1/2 x 1 1/2 inch) stock, apron pieces from 19 by 90 millimeter (1 x 4 inch) boards, and a top panel from 18 millimeter (3/4 inch) plywood or glued up boards, with total wood cost usually between 40 and 70 dollars depending on species. Add a box of 32 millimeter and 38 millimeter (1 1/4 and 1 1/2 inch) pocket screws, a Kreg Jig 520 Pro or similar pro kit, and you still keep the full project cost under 100 dollars while reusing the same drill bit and battery platform you already own.
Time and skill level suit a patient beginner who has already built a shelf or two. Expect a half day of work including cutting, drilling pocket holes, dry fitting, and final assembly, and give yourself extra time to check diagonals so the table does not rock. Use your cordless drill on low gear for drilling the pockets, then switch to a slightly higher clutch setting for driving the screws, and always keep a second battery charged so you are not stuck mid assembly.
Build steps start with a clear order that keeps the project manageable:
- Cut four legs and four apron pieces to size.
- Drill two pocket holes near each end of every apron using the Kreg jig, then add holes every 150 to 200 millimeters (6 to 8 inches) along longer sides if the table is wide.
- Attach the aprons to the legs with 32 millimeter screws to form a rigid frame, checking for square as you go.
- Drill additional pocket holes on the inside of the aprons facing upward, then use those to attach the table top from below with 32 or 38 millimeter screws so no fasteners show on the finished surface.
Face grain orientation matters more on a table than on a simple shelf. Always aim the pockets toward the less visible faces, such as the inside of the aprons or the underside of the top, and let the clean wood faces show outward where hands and eyes land first. If any pockets remain visible, you can use matching wood plugs or a contrasting accent to turn them into a deliberate design detail instead of treating them as flaws.
Choosing the right drill bit for each material is critical as you move from soft pine to hardwoods, and a detailed guide to choosing the right drill bit set for your cordless drill will help you avoid burning bits or tearing out fragile plywood veneers. For pocket hole work, stick with the official stepped bit for the jig, but pair it with brad point bits for pilot holes and hinge cups when your projects grow more complex. That combination of a dedicated pocket bit and general purpose bits keeps your cordless drill set ready for almost any DIY woodworking task.
Project 3 – storage bench, French cleat tool rack, and kids bookshelf
Once you trust your cordless drill and Kreg workflow on smaller builds, a storage bench with a hinged lid shows how strong pocket holes can be. This project uses the same jig and drill guide as your shelves and table, but the larger panels and moving lid demand better layout and more fasteners for strength. The reward is a bench that hides clutter, supports adult weight, and proves that a simple cordless drill and pocket jig can handle real loads.
Suggested bench diagram: Draw a rectangle for the box with pocket holes along the inside edges of the front, back, and sides, plus a hinged top. Mark screw spacing at roughly 150 millimeters (6 inches) along each joint.
Storage bench materials and cost usually land between 60 and 100 dollars in wood, plus hardware. Use 18 millimeter plywood for the box, 19 by 90 millimeter boards for trim, a piano hinge for the lid, and plenty of 38 millimeter pocket screws to tie the panels together, then add a few longer screws where the bench meets the wall. Expect a full day of work for an intermediate DIY woodworker, and keep your drill batteries topped up because drilling dozens of pockets in thick plywood draws more current than a quick shelf.
French cleat tool rack projects show another side of pocket hole joinery. Here you build a wall mounted rail system from plywood strips cut at a 45 degree angle, then use pocket screws to attach tool holders, drill holsters, and small shelves that keep your cordless drill, Kreg jig, and other tool essentials within reach. A two to three hour build window is realistic, and the project is easy to expand as your woodworking habit grows and your cases multiply on the wall.
Kids bookshelf with adjustable shelves combines the box building skills from the bench with the precision of the French cleat rack. You assemble the outer carcass with pocket holes hidden on the top and bottom panels, then drill a series of shelf pin holes using a simple jig template so the shelves can move as your child’s books change size. Plan on a full day for an intermediate builder, a wood budget between 60 and 90 dollars, and a careful drilling sequence so you do not accidentally drill through a pocket into a shelf pin hole.
On all three projects, dust collection and clear layout lines keep your work accurate. Vacuum the Kreg jig and the stepped drill bit often so chips do not pack into the pocket, and mark every pocket location with a pencil before you drill so you do not miss a joint under pressure. When your cordless drill starts to feel weak or the chuck slips, a focused guide on fixing a stuck chuck, a dead battery, or a stalling motor in a cordless drill will help you diagnose problems before they ruin a long day of pocket hole work.
These larger builds also highlight the limits of marketing terms when compared with real world performance. What matters is not the label on the battery or the color of the plastic, but how consistently your drill drives the tenth deck screw or the fiftieth pocket screw without camming out. In the end, the best cordless drill and Kreg jig combination is the one that still feels solid when you sit on the bench, hang a heavy tool rack, or watch a child climb onto a bookshelf without a creak.
Choosing the right drill bit and screws for pocket hole joinery
Every pocket hole setup built around a cordless drill and Kreg style jig lives or dies on the small details of the drill bit and screws you choose. The stepped pocket hole bit that ships with most Kreg kits is engineered to cut a clean pocket and a pilot hole in one pass, and using off brand bits often leads to burned wood or sloppy holes. When you match that bit with the correct length of pocket screws for your material thickness, you get tight joints that do not split the wood or strip under load.
For 18 millimeter plywood or standard three quarter inch boards, 32 millimeter coarse thread pocket screws usually give the best grip. In hardwoods, a fine thread version of the same screws reduces splitting, especially near edges or narrow rails, and you can always test on a scrap pocket before committing to a full project. Keep a small organizer box in your tool area labeled by screw length and thread type so you can follow a consistent routine when you reach for fasteners during a build.
Drill speed and clutch settings matter as much as screw choice. Use the low gear on your cordless drill for drilling the pockets, let the bit reach full speed before it contacts the wood, and back it out briefly to clear chips if your dust collection is weak. When driving screws, start with a medium clutch setting and increase only until the screw head sits flush in the pocket, because overdriving can crush the fibers and weaken the joint even if the wood does not visibly crack.
Face grain orientation and pocket placement also affect long term strength. Aim your pockets into the thicker or less visible parts of the wood, such as the underside of a table top or the inside of a bench frame, and avoid placing holes too close to end grain where the screw holding power is weaker. If you must place a pocket near an edge, drill at a slightly lower speed, let the drill guide do the work, and use a shorter screw to reduce the risk of a breakout on the show face.
Over time, your drill bit will dull, and a worn pocket hole bit burns wood and strains the drill battery more than a sharp one. Inspect the cutting edges regularly, replace the bit when you see blue heat marks or feel extra resistance, and keep a spare in your Kreg kit so a dull bit does not stall a weekend project. Treat these consumables as part of the cost of reliable pocket hole work with a cordless drill and jig, not as optional extras you can ignore.
When you start adding more advanced joinery methods to your cordless drill set, such as dowels or loose tenons, the habits you built around bit choice and screw selection will still pay off. A careful, methodical approach to drill control, hole placement, and fastener sizing is what separates a casual DIY effort from pro level woodworking results. In the end, the strength of your furniture depends less on the brand name on the tool and more on how thoughtfully you match each drill bit and screw to the job at hand.
Maximizing your cordless drill and Kreg jig for long term DIY success
Using a cordless drill with a Kreg jig for pocket hole projects is not just about one weekend build, it is about building a reliable system you can trust for years. That system includes a drill with enough torque to drive pocket screws without stalling, a healthy battery pack that holds a charge through long drilling sessions, and a well maintained jig whose drill guide bushings are not worn oval. When all three pieces work together, cordless drill and Kreg workflows feel smooth, predictable, and almost relaxing.
Start by choosing a drill platform that matches your long term woodworking plans. A compact 18 volt drill with a brushless motor, a metal chuck, and at least two batteries will handle shelves, tables, benches, and most future projects without complaint, while a lighter 12 volt drill can still manage pocket holes in softwood if you work patiently. Avoid ultra cheap drills whose chucks loosen under repeated starts and stops, because pocket hole joinery involves frequent trigger pulls that quickly expose weak clutches and poor electronics.
Maintenance habits keep your pocket hole system accurate and safe. Clean the Kreg jig after every session, clear chips from the drill guide holes, and check that the depth collar on the bit has not slipped, because a wandering collar can blow through a board and ruin a visible face. Wipe dust off your drill and battery contacts, store batteries in a moderate temperature space, and mark the date on each pack so you can track aging and replace weak packs before they strand you mid project.
Workflow planning matters as much as tool choice. Lay out all your boards, mark every pocket location with a sharp pencil, and drill all the pockets in one batch before you switch the drill bit to a driver bit, because constant bit changes slow you down and wear the chuck. This batch approach also lets you check that every pocket hole is in the right place before assembly, reducing the chance that you misread your layout and end up with a visible hole on a show face.
As your skills grow, you may add accessories like clamp pads, right angle clamps, or upgraded dust collection to your pocket hole setup. These extras do not change the core cordless drill and Kreg method, but they do make repetitive work less tiring and help you hold awkward assemblies, such as a tall bookshelf or a long French cleat rail, while you drive the screws. Think of them as comfort upgrades that keep you building longer, not as mandatory purchases before you can start.
Quick safety checklist for pocket hole projects:
- Wear safety glasses whenever you drill or drive screws.
- Clamp workpieces securely before drilling pocket holes.
- Keep hands clear of the bit and driver tip at all times.
- Unplug chargers and remove batteries before changing bits if your drill design requires it.
- Support long boards and panels so they do not tip or twist while drilling.
In the end, the value of pocket hole joinery with a cordless drill is measured not by marketing claims but by the quiet confidence you feel when you sit on a storage bench, lean on a side table, or watch a child climb a bookshelf you built yourself. Strong joints, square corners, and clean faces come from careful drilling, thoughtful screw choice, and a drill you know how to control. That is how a simple pocket, a well tuned jig, and a dependable cordless drill turn into years of DIY woodworking projects that actually earn their place in your home.
FAQ
Do I need a special cordless drill for Kreg pocket hole projects ?
You do not need a special cordless drill for Kreg pocket hole projects, but some features make the work easier. A drill with two speed ranges, a reliable clutch, and at least one spare battery will handle most pocket joinery tasks in softwood and plywood. Avoid very low power drills that struggle to spin the stepped pocket bit at full speed, because they can burn the wood and wear out quickly.
What size pocket hole screws should I use for three quarter inch wood ?
For standard three quarter inch boards or 18 millimeter plywood, 32 millimeter pocket screws are usually the best choice. Coarse thread screws work well in softwoods and plywood, while fine thread versions are better for hardwoods that are prone to splitting. Always test a screw in a scrap pocket before committing to a full project, especially when working near edges or narrow rails.
Can a pocket hole jig replace more advanced joinery tools ?
A pocket hole jig can replace more advanced joinery tools for many everyday DIY projects, such as shelves, tables, benches, and simple cabinets. It will not fully replace mortise and tenon joints or dowel joinery in fine furniture, but it covers a large share of home projects with far less setup and skill. Many woodworkers use pocket holes for hidden structural joints and reserve more complex methods for visible, high stress connections.
How do I prevent pocket holes from showing on my projects ?
The easiest way to prevent pocket holes from showing is to place them on hidden faces, such as the underside of a table top, the inside of cabinet sides, or the back edges of shelves. When a pocket must face outward, you can plug it with matching wood plugs, sand it flush, and finish it to blend with the surrounding surface. Careful planning of board orientation and a clear layout before drilling help you avoid accidental visible pockets.
Is dust collection important when drilling pocket holes ?
Dust collection is important when drilling pocket holes because chips can pack into the pocket and overheat the drill bit. A shop vacuum connected to the jig or frequent pauses to clear chips by hand will keep the bit cutting cleanly and extend its life. Good dust control also improves visibility of your layout lines and keeps your work area safer and more pleasant during longer projects.