Why your drill’s three controls matter more than raw power
Most people buy a cordless drill for power and never touch the clutch ring. Yet the real protection for your screws, the material you are working into, and the motor comes from how the clutch, speed selector, and hammer mode work together. When you understand these three controls, you manage the torque applied instead of letting the drill control you.
On a typical homeowner cordless drill, Speed 1 is the lower gear for maximum torque and controlled driving force. Speed 2 is the higher gear for faster drilling, higher RPM, and cleaner holes in wood or metal when the bit is sharp and the material is not too hard. Treat the speed selector as your first decision before you even think about clutch settings or drilling mode.
For driving screws into drywall, pine, or pressure treated lumber, live in Speed 1 and let the drill clutch do the fine control. That lower speed gives you more time to react, reduces the risk of damaging material, and makes adjusting clutch control feel predictable instead of jumpy. Reserve Speed 2 for drilling holes with a twist bit or spade bit where you want clean chips and less tear out.
Many budget cordless drill sets, like DeWalt’s DCK283D2 or Makita’s XT269M, pair a compact drill with a basic clutch mechanism that still offers 15 to 20 clutch settings. Manufacturer specs for these kits list two mechanical speeds and a torque range that is more than enough for common framing screws, often around 50 to 70 Nm in Speed 1. Even if the drill feels modest on paper, the right clutch setting and speed choice will let you drive long screws into structural materials without cam out or burning the bit. The settings drill makers give you are there to control amount of torque, not to impress on a box.
Think of the trigger as your fine throttle and the clutch setting ring as your governor. Your fingers modulate speed and power, while the clutch control limits maximum torque applied so the screw stops before the head snaps or the material splits. When all three elements work together, driving screws becomes repeatable instead of a guessing game. A simple pro tip from job sites: if you feel your wrist twist before the clutch works, drop to a lower setting or Speed 1 and let the drill clutch protect you.
Cordless drill clutch settings explained in real jobsite terms
The phrase cordless drill clutch settings explained sounds abstract until you feel the click. That click is the clutch mechanism slipping when the torque applied reaches the number you chose on the ring, and that is the sound of your drill protecting the screw and the material. Lower numbers mean a lower setting and less driving force, while higher numbers allow more torque before the clutch works and releases.
Start low on scrap material that matches your project, then walk the clutch setting up. For example, when driving screws into soft pine, a lower setting around 6 to 8 on many drills will sink the screw head just flush without damaging material or stripping the screw. In hardwood or pressure treated lumber, you often need higher numbers, sometimes 12 to 16, to avoid stalling the drill while still keeping some clutch control.
Every drill clutch scale is relative, so treat the numbers as a guide, not gospel. One brand’s 10 can feel like another brand’s 6, especially between compact 12 V tools and more powerful 18 V or 20 V Max drills. That is why adjusting clutch settings on scrap is smarter than trusting a chart printed in a manual.
When you switch the ring to the drill symbol, you enter full drilling mode. In this drilling mode, the clutch is bypassed, the drill clutch no longer slips, and the torque applied is limited only by the motor, the battery, and your grip. Use this setting for drilling holes with a twist bit, spade bit, or hole saw, not for driving screws where you still want the clutch mechanism to protect the work.
New users often crank the clutch to the maximum, leave it in drilling mode, and then wonder why they are damaging materials and snapping screw heads. Respect the lower numbers for delicate work like cabinet hinges, electrical plates, and small screws, and save the higher clutch settings for framing screws or lag screws into structural materials. The more you practice with different materials and screws, the more instinctive your choice of setting becomes.
Matching speed, clutch and bit to the material you are working
Safe drilling practices start with matching speed and clutch settings to the material, not the other way around. When you are drilling or driving into drywall, softwood, hardwood, metal, or pressure treated lumber, each material responds differently to torque, speed, and heat. Your drill, the bit, and the clutch setting must work together so you control amount of force instead of fighting kickback or stripped threads.
For driving screws into drywall or soft pine studs, use Speed 1, a medium clutch setting around 8 to 12, and a sharp bit that fits the screw head snugly. This combination keeps the driving force low enough to avoid blowing through the paper face while still seating the screw head slightly below the surface. If the clutch works and chatters before the head is flush, bump the clutch control one or two numbers higher and try again.
Hardwood and pressure treated lumber demand more torque and sometimes a pilot hole. In these tougher materials, start low on the clutch ring around 10, test on scrap, then raise to higher numbers until the screw drives without stalling yet stops before over sinking. If you feel the drill bogging down even at a higher clutch setting, pre drill with a smaller bit to reduce the load.
Metal is a different game because speed and heat matter more than raw power. Use Speed 1, switch to drilling mode so the clutch does not slip, and apply steady, lower pressure so the bit cuts instead of skates across the material. A drop of cutting oil and a slower speed protect both the bit and the drill motor from overheating.
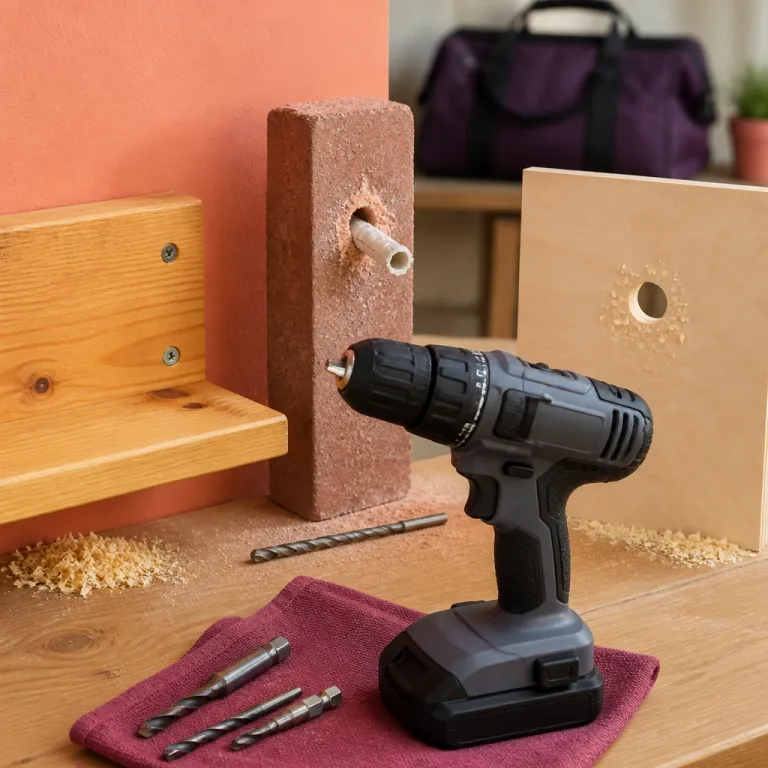
Masonry like brick or block requires hammer mode plus the right carbide masonry bit, and here a dedicated hammer drill is often safer and faster. If your cordless drill has a hammer symbol, use it only with masonry bits and never on tile, wood, or metal, because the percussive action can shatter brittle materials or crack tiles instantly. For a deeper dive into choosing durable masonry bits that match your drill’s power and clutch settings, study a detailed guide to carbide masonry bit selection on a specialist site such as the one focused on carbide masonry bits that outlast the drill.
Step by step: setting up for driving screws without damage
Before driving screws into a finished project, treat setup as part of safe drilling practices. Clamp a piece of scrap material that matches your workpiece, load the right bit, and choose Speed 1 for maximum control. This small ritual lets you test different clutch settings and speeds without risking damaging material on the real piece.
Start low on the clutch ring, maybe at 4 or 5, and drive a test screw. If the clutch works and chatters before the screw head reaches the surface, you know that lower setting is too gentle for this combination of screw and material. Increase the clutch setting by two numbers, drive another screw, and repeat until the head lands just flush or slightly recessed without stripping.
Once you find the sweet spot, remember that longer screws and harder materials may still need higher numbers. A 50 millimetre screw into soft pine might be happy at 8, while a 75 millimetre screw into pressure treated lumber could demand 12 or more on the same drill clutch. Always adjust based on feel, not pride about running the highest clutch control your drill offers.
Use the forward and reverse switch as more than an on off for direction. Forward drives the screw, reverse backs it out cleanly when the bit starts to cam out or the screw binds, and a quick tap in reverse can help start threads in tough materials without overloading the bit. When you are working overhead or in awkward positions, that tiny switch becomes a safety feature as much as a convenience.
Never drive in Speed 2 with the clutch maxed out when you are working near edges, corners, or delicate surfaces. The combination of high speed, high torque, and no effective clutch mechanism is how you send a screw straight through drywall or crack a cabinet face frame. Respect the drill’s controls and they will protect both you and the workpiece.
Common mistakes with speed, clutch and hammer mode
One of the most common mistakes is treating the drill like a single speed screwdriver. People leave the selector in Speed 2, crank the clutch setting to the maximum, and then wonder why they are stripping screws and damaging materials. In reality, most homeowners should live in Speed 1, with medium clutch settings, and reserve drilling mode and hammer mode for specific tasks.
Running in drilling mode while driving screws removes the safety net that the clutch provides. When the clutch works correctly, it slips before the torque applied can snap the screw or twist your wrist, but drilling mode bypasses that protection entirely. Use the drill symbol only when you are drilling holes with a bit, not when you are driving screws into wood, metal, or plastic.
Hammer mode is another setting that is often misunderstood and misused. It is designed for masonry materials like concrete, brick, and block, where the percussive action helps the bit chip away at the surface while rotating. Using hammer mode on tile, wood, or metal is a fast way to crack, burn, or otherwise damage the material you are working on.
Ignoring the relationship between lower numbers and higher numbers on the clutch ring is a quieter but equally costly error. Lower numbers are for delicate work, small screws, and softer materials, while higher clutch settings are for structural screws, lag screws, and dense materials like hardwood or pressure treated lumber. If you always start low instead of start high, you give the clutch mechanism a chance to protect the work and avoid unnecessary damage.
Finally, many users forget that adjusting clutch settings is not a one time decision for the whole project. Change the setting when you switch from framing to trim, from long screws to short screws, or from one material to another, because the driving force required changes each time. The drill already gives you the controls you need, and using them wisely is what separates a clean job from a box of stripped screws.
FAQ
How do I choose the right clutch setting for different materials ?
Match the clutch setting to both the screw size and the material. Start low on scrap, then raise the number until the screw seats flush without the clutch chattering too early or the head stripping. Softer materials like drywall and pine need lower numbers, while hardwood and pressure treated lumber usually need higher clutch settings.
When should I use drilling mode instead of the numbered clutch settings ?
Use drilling mode, usually marked with a drill symbol, when you are drilling holes rather than driving screws. In this mode the clutch is bypassed, so the torque applied is limited only by the drill’s motor and your grip. Reserve this setting for twist bits, spade bits, and hole saws in wood or metal, not for driving screws.
Is hammer mode safe for tile, wood, or metal ?
Hammer mode is designed only for masonry such as brick, block, and concrete. Using it on tile, wood, or metal can crack brittle surfaces, damage the bit, and overload the drill. For those materials, stay in standard drilling mode with the hammer function turned off.
Why does my drill keep clicking and stopping when I drive screws ?
The clicking sound is the clutch mechanism slipping because the torque has reached the setting you chose. If the screw is not fully seated, increase the clutch setting by one or two numbers and try again. If the drill still clicks without progress, pre drill a pilot hole or move to a slightly higher clutch setting while staying in Speed 1.
Should I drive screws in Speed 1 or Speed 2 on my cordless drill ?
For most driving screws tasks, especially for a first time user, Speed 1 is safer and more controlled. It provides higher torque at a lower speed, giving the clutch more time to react and reducing the chance of stripping the screw or damaging material. Use Speed 2 mainly for drilling holes where you need higher RPM with the drill in drilling mode.