Why tile cracks and why hammer mode ruins everything
Most people learn how to drill into tile without cracking only after breaking a tile. When a cordless drill slams a hard carbide or masonry bit into a glazed tile surface at high speed, the brittle glaze shatters before the drill bit ever cuts into the body of the material. That is why drilling into bathroom tiles with hammer mode engaged is almost guaranteed to chip the glaze, spiderweb the pattern, or blow out a corner near the wall.
Think about what hammer mode actually does inside your drill when you drill into masonry or concrete. The internal mechanism pulses the bit forward so it repeatedly punches into tile instead of shaving away material in a slow steady spiral, and that impact concentrates force on a tiny point of the tile surface where the glaze is thinnest and most fragile. On porcelain tiles and dense ceramic tiles this impact is even harsher, because the porcelain body is harder than many drill bits and simply refuses to give way until the glaze has already failed.
For a homeowner with a single cordless drill set, the safest move is simple. Turn hammer mode off before any tile drilling, set the clutch around 8 to 12 as a starting guideline (most major brands, including DeWalt and Makita 18 V drills, recommend mid range clutch settings for delicate work), and keep the speed selector in low gear so the drill spins slowly while you ease the bit into tile. Treat drilling tile more like careful metalwork than rough framing, because the best results come when the drill, the bit, the tile surface and your hands all work together instead of fighting each other.
Choosing the right drill bits for ceramic, porcelain and stone
Getting how to drill into tile without cracking right starts with bit choice. For standard ceramic tiles on a bathroom wall, a spear point glass and tile drill bit with a carbide tip is usually the best option, because it can bite gently into the glossy tile surface without skating across the glaze. When you move to harder porcelain tiles or dense porcelain bathroom tiles, that same style of drill bit still works for small anchors, but it must be very sharp and used at low speed with almost no pressure.
Porcelain tiles and some ceramic tiles used on floors are so hard that a diamond tipped tile drill is often safer and more predictable. These diamond drill bits are usually hollow cores that grind their way into tiles rather than cutting, and they shine when you need a 6 to 10 millimetre hole for a shower screen, grab bar or bathroom accessories. For larger openings in ceramic tiles or porcelain tiles, such as mixer valves or showerheads, a full size diamond drill core bit is the right tool, because it spreads the cutting action around a ring instead of forcing one point of contact to do all the drilling into the brittle material.
Natural stone tiles like marble or travertine behave differently again. They are softer than porcelain but can fracture along veins if a drill tile operation starts too aggressively, so a diamond tipped core bit run at low speed with plenty of water is the safest way to drill tiles in these materials. If you are already comfortable mastering the art of etching socket tools with a cordless drill set, you will recognise the same principle here, because controlled speed and the right drill bits matter more than raw power when you drill into delicate surfaces.
Speed, pressure and the masking tape trick
Once you have the right tile drill bit, the next step is controlling speed and pressure. Most cordless drills have a low gear that tops out around 400 to 600 revolutions per minute, and that is exactly where you want to be when you drill into tile so the bit can grind slowly without overheating or grabbing. Squeezing the trigger only halfway keeps the drilling tile process gentle, while the clutch set around the middle of its range stops the drill from suddenly torquing your wrist and snapping the bit against the tile surface.
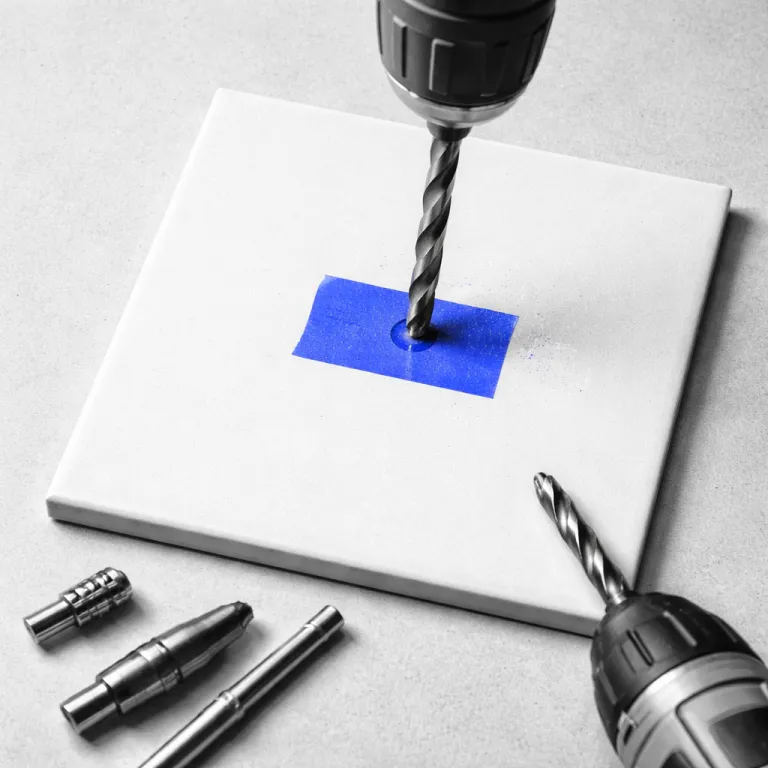
Glazed tiles are slippery, so the bit loves to wander before it cuts into tiles. A simple square of masking tape or painter’s tape over the mark gives the drill bit something to bite into, and crossing two strips of masking tape into a plus sign adds even more grip for the tip of the bit. This masking tape trick is especially useful on bathroom tiles above a tub or in a shower, where you are often drilling into a vertical wall and fighting both gravity and a wet tile surface. In practical tests on typical glazed wall tiles, a single layer of tape is usually enough to stop the bit skating if you start at very low speed.
Cooling matters as much as speed when you are drilling tiles with diamond tipped cores. Keeping a small sponge soaked with water under the bit while you drill tiles helps carry away heat, protects the bond that holds the diamond drill grit, and reduces dust that could scratch nearby ceramic tiles or porcelain tiles. For a deeper dive into how cordless tools behave on fragile finishes, it is worth reading a detailed guide on mastering the art of drilling into tile with cordless drills, because those step by step techniques translate directly to safer tile drilling at home. The annotated photo below shows the masking tape start, correct drill angle and a simple water cooling setup so you can copy the same approach.

Step by step: from layout to clean hole in bathroom tiles
Start by planning exactly where you will drill tiles, not just roughly where the accessory should sit. Use a tape measure to mark the centre of each fixing point on the bathroom wall, then double check that those marks land in the middle of individual tiles rather than on grout lines, because drilling into grout often leads to loose anchors and cracked edges. Once you are happy with the layout, press a small square of masking tape over each mark so the drill bit will not skate across the tile surface when you begin.
Next, fit the correct tile drill bit into your cordless drill and set the gearbox to low speed. Hold the drill at a perfect right angle to the tile surface, brace your forearm against the wall if you can, and start the drill into tile at a very slow steady rotation until the bit has created a shallow dimple through the glaze. Only after that first step should you increase speed slightly, letting the bit or diamond drill core grind its way deeper while you maintain light, even pressure and avoid leaning your body weight into tiles.
For porcelain tiles or thick ceramic tiles, pause every few seconds to dip the bit in water or dab the hole with a damp sponge. This keeps both the bit and the tile cooler, which reduces the risk of thermal shock that can crack bathroom tiles around the hole as drilling tiles progresses. When you feel the bit break through the back of the tile into the hollow behind the wall, ease off the trigger immediately so the drill does not suddenly lurch forward and chip the exit edge of the hole.
Matching your cordless drill set and knowing when to call a pro
Not every cordless drill set is equally suited to delicate tile drilling, even if the marketing copy suggests otherwise. Compact 12 volt drills with good chuck runout control and smooth low speed triggers often give you better finesse when you drill into tile than big hammer drills that are tuned for concrete, because they let you hold a slow steady rotation without cogging or surging. What matters most is a drill with a reliable clutch, a true spinning chuck that does not wobble, and enough torque in low gear to keep diamond tipped bits moving without stalling.
If you are choosing a new drill specifically with tile work in mind, pay more attention to trigger control and clutch range than to peak torque numbers. A model that lets you feather the trigger from zero to a few hundred revolutions per minute gives you precise control when drilling into porcelain tiles, while a wide clutch range helps you fine tune how much force reaches the drill bit before it slips. For help comparing platforms and understanding which tools behave best at low speed on hard surfaces, a specialised cordless drill buying guide on how to choose with confidence can be a useful reference when you weigh different tools.
There are times when the safest move is to call a professional rather than drill tiles yourself. Large format porcelain tiles, thin marble slabs and heavily patterned ceramic tiles in high visibility areas leave almost no margin for error, because one cracked tile can mean removing a whole section of the bathroom wall to replace it. If you are facing multiple large holes, complex layouts or expensive imported tiles, paying a tiler who owns dedicated water cooled diamond drill rigs is often cheaper than gambling on a single misaligned step with a household drill and a basic set of drill bits. For broader safety advice on working with power tools, including eye protection, dust control and keeping electrical cords clear of water, a general workshop safety page is also worth reviewing before you start.
FAQ
What drill bit should I use for standard ceramic bathroom tiles ?
For typical glazed ceramic bathroom tiles on a wall, a carbide tipped glass and tile drill bit with a spear point is usually the safest choice. It can start a hole cleanly without wandering across the tile surface, especially if you add a small square of masking tape over the mark. Run the drill at low speed with light pressure so the bit grinds gently into tile instead of grabbing.
Can I use hammer mode when drilling into porcelain tiles ?
Hammer mode should stay off whenever you drill into porcelain tiles or ceramic tiles. The percussive action concentrates impact on a tiny area of the glaze, which often leads to chips or radial cracks before the bit has cut into tiles. Use low speed, no hammer, and let a sharp tile drill or diamond drill bit do the work with minimal pressure.
How do I stop the drill bit from slipping on glossy tile surfaces ?
Glossy tiles are notoriously slippery, so the bit tends to skate before it bites into the glaze. Placing a small square of masking tape or painter’s tape over the drilling mark gives the drill bit extra grip and helps you start the hole exactly where you want it. Some people also use a centre punch on very hard porcelain, but on brittle bathroom tiles the tape method is usually safer.
Do I need water when drilling tiles with diamond tipped bits ?
Water is strongly recommended whenever you use diamond tipped or diamond core bits on porcelain tiles, ceramic tiles or natural stone. A small trickle of water or a damp sponge held under the bit keeps the cutting edge cool, extends the life of the diamond drill and reduces the risk of heat related cracking in the tile surface. Just work slowly and keep electrical connections for the drill well away from any water.
What clutch and speed settings are best for drilling tile with a cordless drill ?
On most homeowner cordless drills, low gear and a clutch setting around 8 to 12 work well for drilling tile, but always treat those figures as guidelines rather than strict rules because different brands use different scales. Low gear limits the maximum speed so you can maintain a slow steady rotation, while the mid range clutch setting prevents sudden torque spikes that might snap a bit or chip the tile surface. Always start at the lowest trigger pressure that keeps the bit turning smoothly, then adjust slightly upward only if the drilling into tile stalls.