Why a wall-mounted charging station changes how you use your drills
A wall-mounted charging station turns a messy bench into a calm, efficient workstation. When your DIY wall-mounted drill charging station plans are built around your actual cordless drill sets, you stop hunting for batteries and chargers before every small repair. The single most useful change is that every drill, battery and drill bit has a predictable, easy-grab home on the wall.
Think about your own shop or garage as a working space, not a storage locker, because a compact charging rack on the wall keeps the floor clear and the bench free for real work. A good plan treats the station as part of overall storage organization, tying into other shop projects like a miter station or a clamp rack so your tools flow logically from cut to assembly. When you design the shelves and the bottom shelf for your drill holder with intention, the whole shop build feels more like a high quality workspace and less like a pile of random tools.
Most DIY drill charging station plans start with a simple plywood box, yet the best ones behave like a small shop project that earns its space every day. You cut and build a shallow cabinet, then add shelves and a dedicated charging shelf so every cordless drill and charger has a labeled slot. Done well, this one station will handle drill charging, bit storage and even a power strip for other tools without feeling cramped.
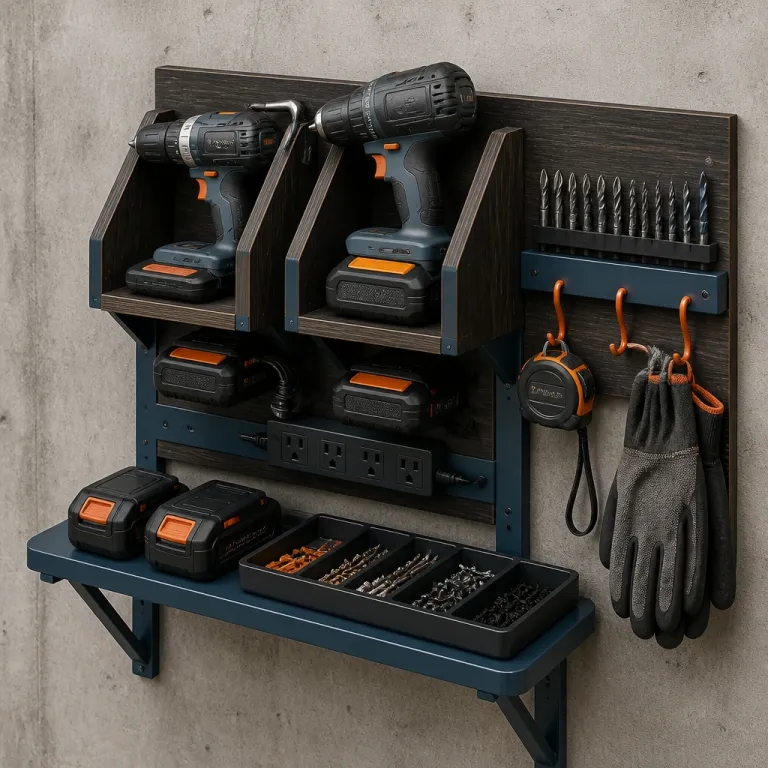
Example layout for a 3–4 drill wall station: a cabinet 700 mm wide, 600 mm tall and 250 mm deep, with a 100 mm-tall drill holder rail under a 250 mm-deep bottom shelf, gives enough room for common 18–20 V drills and chargers while still fitting above a workbench.
Quick materials and tools checklist: 18 mm plywood sheet (at least 1220 mm × 2440 mm), wood glue, 4 mm × 50 mm and 3.5 mm × 30 mm wood screws, power strip with overload protection, stud finder, tape measure, speed square, pencil, circular saw or table saw, jigsaw, drill/driver, clamps, sanding block, safety glasses and hearing protection.
Planning the layout so every drill and battery actually fits
Before you cut any plywood, measure your largest cordless drill with its biggest battery installed and note the height, width and depth of that drill. Good DIY drill charging station plans start from those numbers, because the station must fit your real tools rather than some generic sketch from a shop project video. If you run a mix of platforms like DeWalt 20V Max, Milwaukee M18 and Makita LXT, line them up on a bench and check how their handles and battery packs will hang from a drill holder rail.
Lay out the plan on the plywood with a sharp pencil and a speed square, then mark each step directly on the sheet so you know where every shelf and bottom shelf will land. I like to mark the parts cut list right on the offcuts, which keeps the build moving at a steady pace and avoids that one missing piece that stalls your shop build late in the day. This is also the moment to decide whether you want a deeper charging station with two rows of drills or a slimmer station that hugs the wall but uses taller shelves for chargers and cases.
Think through how many chargers you own now and how many you might add when you upgrade to higher capacity batteries or even a 36 V Li-ion pack, because your charging shelf should not be full on day one. If you are curious about how larger packs change runtime and weight, a detailed guide on how a 36 V Li-ion battery can transform your cordless drill set experience will help you size the station for future upgrades. A well thought out plan here will keep your shop storage flexible, so you can slot in new tools without rebuilding the whole station.
Sample materials and cut list for a 3–4 drill cabinet (18 mm plywood): two sides 600 mm × 250 mm, one top 664 mm × 250 mm, one bottom shelf 664 mm × 250 mm, two internal shelves 664 mm × 220 mm, one drill holder rail 664 mm × 120 mm, and an optional back panel 664 mm × 564 mm with ventilation cutouts. Print this list or copy it to a notepad so you can check off each part as you cut.
Cutting and assembling the plywood cabinet safely and accurately
Once the layout is set, you can cut the plywood panels for the cabinet sides, top, bottom and shelves with a circular saw or table saw. Clamp a straightedge and use your speed square to align the saw at each cut, because square parts cut now will make the station assemble quickly and hang straight on the wall. Label every part as you go so you do not mix up the top, bottom shelf and internal shelves during the build.
Step-by-step assembly for a basic wall-mounted drill charging station:
- Sand the cut edges lightly to remove splinters and check that opposing parts match in size.
- Mark screw locations 40 mm from each edge and space remaining screws 150–200 mm apart along every joint.
- Predrill clearance holes through the cabinet sides and pilot holes into the mating edges to prevent splitting.
- Apply a thin bead of wood glue to the top and bottom edges, clamp the box square and drive 4 mm × 50 mm wood screws in a consistent pattern.
- Slide the internal shelves into position, confirm they are level, then glue and screw them through the cabinet sides.
- Attach the optional back panel with glue and 3.5 mm × 30 mm screws, leaving planned ventilation openings near the chargers.
Dry fit the cabinet on the floor or bench before you add any screws, checking that the shelves slide in cleanly and that the drill holder rail has enough clearance for your cordless drill handles. I prefer to predrill and then drive high quality wood screws rather than rely only on glue, since a fully loaded charging station with four drills, chargers and spare batteries can weigh more than 15 kilograms. When you are happy with the fit, run a small bead of glue in each joint, clamp the box and then drive the screws in a consistent pattern so the cabinet looks as neat as any other shop projects you are proud of.
Now is the time to cut the slots for the drill holder, which can be as simple as a horizontal plywood strip with U-shaped notches that cradle each drill. Mark each notch with the speed square, cut down with a jigsaw and then sand the edges so the handles slide in with an easy grab motion. If you want the build to stay super easy, keep the joinery basic and focus on accurate layout, solid screws and a clean, square cabinet that will mount flat against the wall.

Quick-build timeline: layout and marking (30–45 minutes), cutting parts (45–60 minutes), assembly and drilling ventilation (60–90 minutes), sanding and mounting prep (30–45 minutes). Most home woodworkers can complete the project comfortably in a weekend.
Designing charging, cord routing and bit storage that work long term
With the cabinet assembled, you can turn it from a plain box into a real charging station by adding a power strip, cord routing and smart storage organization for bits and accessories. Mount a good quality power strip with overload protection on the inside wall or underside of a shelf, leaving enough space for the bulky charger bricks that come with many cordless drill kits. Route the cords behind the station through small cutouts, so the front stays clean while the chargers handle drill charging quietly in the background.
Heat is the silent battery killer, so leave air gaps around each charger and avoid packing them tight against the back of the station or under a low shelf. For long term battery health, follow the manufacturer’s terms of service and charging guidance, and review a dedicated cordless drill battery care guide that explains storage, charging cycles and when to replace packs. Good DIY drill charging station plans always include ventilation holes or a slightly open back panel, which lets warm air escape while the chargers run for hours.
Bit storage is where this shop project can really shine, because a few smart touches make every drill bit and driver tip visible and within reach. You can add a magnetic strip along the front edge of a shelf, drill through a hardwood dowel to hold common bits, or tuck a shallow drawer under the bottom shelf for small parts cut offs and fasteners. When everything from the smallest drill bit to the largest hole saw has a labeled spot, you will feel that quiet shop love every time you walk in and see a tidy, high quality station instead of a tangle of cords.
Clearance and ventilation details: allow at least 50 mm of space above each charger and 25 mm behind it for cord bends, and drill several 25–30 mm diameter ventilation holes near the top and bottom of the back panel to promote natural airflow.
Electrical safety and load guidance: add up the input wattage or amperage printed on each charger label and make sure the total stays below the rating of your power strip and wall circuit (for example, many household circuits are 15 A or 20 A). Do not daisy-chain multiple power strips or run cords where they can be pinched by the cabinet. If you are unsure about circuit capacity, outlet condition or local electrical code, consult a qualified electrician and follow local regulations before mounting or wiring any charging equipment.
Mounting, safety checks and adapting the station to your shop
Hanging the finished station on the wall is the last critical step, because a fully loaded cabinet puts serious stress on the fasteners and wall structure. Use a stud finder to locate at least two studs, then drive long structural screws through the cabinet back and into the studs so the station will not sag or pull away over time. If your walls are masonry, use appropriate anchors rated for more than the combined weight of the cabinet, drills, chargers and shelves.
Once mounted, load the drills one by one and check that each drill holder slot supports the tool securely without binding or scraping the trigger. Slide the chargers onto their shelf, plug them into the power strip and confirm that the cords hang freely without pinching, which keeps the charging process reliable and reduces strain on the plugs. This is also a good moment to test how the station works alongside your miter station or other shop storage, making sure you can move from cut to assembly without awkward detours.
If you want to integrate the station into a larger shop build, you can align its bottom shelf with adjacent cabinets, or even design a modular shelf that locks into a mobile system similar to jobsite storage crates. For readers who rely on precise cordless tools for demanding work, a detailed review of Metabo drill sets for precise cordless power on demanding jobsites shows how pro-grade tools benefit from a dedicated charging and storage hub. However you adapt the plan, the key thing is that the station feels super easy to use every day, turning drill charging and tool storage from a chore into a quiet background habit that keeps your gear ready for the next project.
Mounting hardware examples and load considerations: for wood studs, use at least four 6 mm × 75 mm structural screws through the upper and lower rails; for solid masonry, use 8 mm sleeve anchors or heavy-duty wall plugs with matching screws, tightened so the cabinet sits flat without crushing the plywood. As a rough guide, design your fasteners and anchors for at least twice the estimated fully loaded weight of the station, and follow local building code or a structural professional’s advice if you are unsure.
FAQ
How thick should the plywood be for a drill charging station ?
For most wall-mounted DIY drill charging station plans, 18 millimetre plywood offers the best balance of strength and weight. Thinner panels can flex under the load of multiple cordless drill bodies and chargers, especially on wider shelves. If you plan to store heavier tools or many batteries, stepping up to 21 millimetre plywood for the sides and bottom shelf adds extra stiffness.
How many drills can a typical wall-mounted station hold safely ?
A compact home shop station usually holds three to four drills or drivers plus their chargers without stressing the cabinet. The exact number depends on the width of the drill holder rail, the spacing between slots and the strength of the wall mounting screws. When in doubt, design the plan for one fewer tool than the maximum theoretical fit, which keeps loading and unloading super easy.
Do I really need a power strip inside the charging cabinet ?
Building a power strip into the charging station is not mandatory, but it makes drill charging far more convenient and reduces cord clutter on the wall. A strip with individual switches lets you turn specific chargers on or off without unplugging them, which can extend charger life and cut standby power use. Just be sure to mount the strip where plugs and cords have room to breathe and will not overheat.
How should I ventilate the station to protect my batteries ?
Battery chargers generate noticeable heat, so your DIY drill charging station plans should include ventilation gaps or holes near the top and bottom of the cabinet. Leaving the back partially open or drilling a pattern of large holes behind each charger allows warm air to escape naturally. Combined with following the manufacturer’s battery care guidance, this simple step helps maintain long term battery health.
Can this type of station work in a very small shop ?
A wall-mounted charging station is especially useful in a small shop, because it lifts drills, chargers and bits off the bench and consolidates them in one vertical zone. You can scale the plan down in width and depth, or even build a narrow version that fits between studs while still holding two drills and a few shelves. The key is to prioritize the tools you use most often and give them the prime easy grab positions on the drill holder rail.