Understanding the parts of your cordless drill
Key Components Every User Should Know
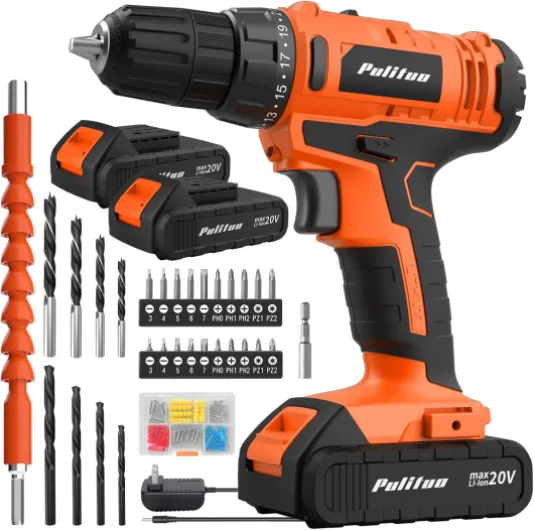
Before you start drilling holes or driving screws, it’s important to get familiar with the main parts of your cordless drill set. Understanding these components will help you work more efficiently and safely, no matter the material or project size.
- Chuck: This is the part at the front of the drill that holds the drill bit or driver bit. Most cordless drills feature a keyless chuck, allowing you to change bits quickly by hand. The chuck size determines the maximum diameter of bit you can use, which is crucial for drilling large holes or using specialty bits.
- Drill Bits and Driver Bits: Drill bits are designed for making holes in various materials, while driver bits are used for driving screws. Having the right set of bits ensures your drill will perform well whether you’re drilling or driving. For more on selecting the right auger or specialty bits, check out this guide to choosing the right bits and augers.
- Torque Adjustment: The torque ring or collar lets you control the amount of force the drill applies when driving screws. Lower settings are ideal for delicate work material, while higher settings are better for driving screws into harder surfaces.
- Speed Control: Most power drills have variable speed triggers and sometimes a two-speed gearbox. Lower speeds are best for driving screws or drilling into metal, while higher speeds are suited for drilling holes in wood or other soft materials.
- Direction Switch: This switch changes the rotation direction of the drill, allowing you to drive screws in or remove them easily. Always check the direction before starting your work.
- Battery and Power Indicator: Cordless drills rely on rechargeable batteries. The battery’s voltage affects the drill power and runtime. Some models include a power indicator to help you monitor battery life during drilling work.
- Grip and Trigger: A comfortable grip and responsive trigger are essential for control, especially when drilling large holes or working for extended periods.
Knowing these parts is the first step to mastering your cordless drill set. As you move forward, you’ll see how choosing the right drill bit and setting up your drill safely can make a big difference in your results.
Choosing the right drill bit for your project
Matching Drill Bits to Your Project Needs
Choosing the right drill bit is a crucial step for successful drilling work. The type of bit you select will directly impact the quality of the hole, the ease of drilling, and the lifespan of your cordless drill set. Drill bits come in various shapes, sizes, and materials, each designed for specific tasks and work materials. Before you start, always check that your drill chuck is compatible with the bit you plan to use.
- Twist bits: These are the most common and versatile, suitable for drilling holes in wood, plastic, and light metals. Their spiral design helps remove debris from the hole as you drill.
- Masonry bits: Designed for drilling into brick, stone, or concrete. They have a carbide tip that withstands the hardness of these materials.
- Spade bits: Ideal for making large holes in wood quickly. Their flat, paddle-like shape helps them cut through material efficiently.
- Brad point bits: These bits are perfect for precise woodwork, as the pointed tip keeps the bit from wandering on the surface.
- Driver bits: Used for driving screws rather than drilling holes. They come in various shapes to match screw heads, such as Phillips, slotted, or Torx.
When selecting a drill bit, consider the size of the hole you need and the hardness of the work material. For example, drilling into metal requires a high-speed steel bit, while woodwork often benefits from brad point or spade bits. If you need to make a pilot hole before driving screws, choose a bit slightly smaller than the screw diameter. This helps prevent splitting the material and makes driving screws easier.
For those working with a variety of materials, investing in a quality drill bit set can save time and improve results. If you want more guidance on selecting the best drill bits for your power drill, check out this detailed resource on choosing the right drill bit sets for your cordless drill.
Remember, the right bit will not only make your drilling work more efficient but also protect your drill power and extend the life of your bits. Always ensure your bit is securely fastened in the drill chuck before starting, and adjust the speed and torque settings on your driver drill to match the material and bit type. This careful approach will help you achieve clean, accurate holes and make driving screws much easier.
Setting up your cordless drill safely
Preparing your drill for safe and effective use
Before you start drilling holes or driving screws, it’s important to set up your cordless drill properly. This step ensures both your safety and the quality of your work. Here’s how to get your drill ready for action:
- Check the battery: Make sure your drill’s battery is fully charged. Low drill power can cause the drill to stall or the bit to get stuck in the material.
- Select the right drill bit or driver bit: Match the bit to your work material and the task—whether it’s drilling holes, driving screws, or making a pilot hole. Using the correct drill bits or screwdriver bits prevents damage to both the bit and the work surface.
- Insert the bit securely: Open the drill chuck by turning it counterclockwise. Insert the bit as far as it will go, then tighten the chuck by hand. For extra security, use the drill’s chuck key if your model includes one. A loose bit can slip, damaging the hole or causing injury.
- Set the torque and speed: Adjust the torque setting for the material you’re working with. Lower torque is ideal for driving screws, while higher torque is better for drilling large holes. Set the speed according to the size of the drill bit and the type of material—slower speeds for large bits or hard materials, higher speeds for small bits or soft materials.
- Check the direction: Make sure the direction drill switch is set to forward for drilling or driving, and reverse for removing screws or backing out a stuck bit.
- Secure your work: Clamp down the work material if possible. This prevents movement and helps you drill holes more accurately.
- Wear safety gear: Always wear safety glasses to protect your eyes from flying debris, especially when drilling into tough materials or making large holes.
Taking these steps before you start drilling or driving screws will help you avoid common issues and ensure your drill work goes smoothly. If you’re interested in advanced techniques, such as using your cordless drill set for etching socket tools, check out this practical guide to etching socket tools with a cordless drill set.

- + Powerful 24V brushless drill with 400 In-lbs of torque
- + High-speed circular saw at 4,800 RPM
- + Includes two 2.0Ah USB-C batteries
- + Comes with rapid charger (65W)
- + Includes braided cable for durability
Techniques for drilling into various materials
Adapting Your Drilling Technique to the Work Material
When drilling holes with a cordless drill set, the approach you take depends on the work material. Whether you’re working with wood, metal, masonry, or plastic, understanding how your drill, drill bits, and driver bits interact with each material will help you achieve cleaner results and extend the life of your tools.
- Wood: For wood, use standard twist drill bits or spade bits for large holes. Start with a pilot hole to prevent splitting, especially near edges. Set your drill speed high and use moderate pressure. If driving screws, a driver bit and the right torque setting will prevent overdriving.
- Metal: Drilling into metal requires high-speed steel (HSS) bits. Mark your hole with a center punch to keep the bit from wandering. Use a lower speed and steady pressure. Lubricate the bit to reduce heat and wear. The drill chuck should be tight to avoid slippage.
- Masonry: For brick or concrete, use masonry bits. Set your power drill to hammer mode if available. Start slow, letting the bit do the work. Avoid forcing the bit, as this can damage both the bit and the material. Remove dust from the hole as you drill.
- Plastic: Use a sharp bit and moderate speed. Too much power or speed can melt the plastic. Drill a small pilot hole first, then enlarge it if needed. Support the work material to prevent cracking.
Controlling Drill Power, Speed, and Direction
Adjusting your drill’s power and speed settings is crucial for different materials. Lower speeds and higher torque are best for driving screws and drilling into hard materials. Higher speeds work well for soft materials and small holes. Always check the direction drill switch before starting—forward for drilling, reverse for removing bits or driving screws out.
Step-by-Step for Drilling Holes
- Secure your work material to prevent movement.
- Select the correct drill bit for the material and hole size.
- Insert the bit into the drill chuck and tighten securely.
- Mark the spot where you want to drill holes.
- Set the drill speed and torque based on the material.
- Hold the drill perpendicular to the surface for a straight hole.
- Start drilling at a low speed to create a guide, then increase speed as needed.
- For large holes, use a smaller bit first to create a pilot hole, then switch to the larger bit.
- Let the bit do the work—don’t force it.
- Withdraw the bit occasionally to clear debris and prevent overheating.
Tips for Driving Screws and Using Screwdriver Bits
Switch to a driver bit when driving screws. Adjust the torque setting to avoid stripping the screw or damaging the work material. For long or large screws, drilling a pilot hole first will make driving easier and prevent splitting. Always match the driver bit to the screw head for best results.
Maintaining your cordless drill set
Keeping your drill set in top condition
Regular maintenance is key to ensuring your cordless drill set delivers consistent power and performance. A well-cared-for drill will make drilling holes, driving screws, and switching between bits much smoother. Here are some practical steps to help your drill and bits last longer:- Clean after every use: Dust and debris from drilling into different materials can build up around the chuck, vents, and drill bits. Use a dry cloth or compressed air to remove particles, especially from the drill chuck and bit holders.
- Inspect your bits and accessories: Check drill bits, driver bits, and screwdriver bits for wear or damage. Dull or bent bits make drilling and driving less efficient and can damage your work material.
- Lubricate moving parts: Occasionally apply a drop of light machine oil to the chuck and any exposed metal parts. This helps prevent rust and keeps the chuck operating smoothly when changing bits.
- Monitor battery health: For cordless power drills, always recharge batteries before they are fully drained. Store batteries in a cool, dry place, and avoid exposing them to extreme temperatures to maintain drill power and longevity.
- Check torque and speed settings: Make sure the torque and speed selectors move freely. If you notice stiffness or resistance, clean around the selectors and avoid forcing them, as this can damage internal components.
- Store properly: Keep your drill, bits, and accessories in their case or a dry toolbox. This protects them from moisture, dust, and accidental drops, especially when transporting your drill set to different work sites.
When to replace parts and bits
Even with careful maintenance, some parts will eventually wear out. Replace drill bits when they become dull or chipped, as a sharp bit will make cleaner holes and reduce strain on your drill. If the chuck no longer holds bits securely, or if you notice a drop in drill power or inconsistent speed, it may be time for professional servicing or replacement parts. Regularly checking these components ensures your drill work remains efficient and safe.Troubleshooting common cordless drill issues
Quick fixes for common drill problems
If your cordless drill set isn’t performing as expected, don’t worry—most issues are easy to resolve with a few simple steps. Here are some practical troubleshooting tips to keep your drill, bits, and driver working smoothly:- Drill won’t start or has low power: First, check the battery. Make sure it’s fully charged and properly seated in the drill. If the drill still won’t turn on, try a different battery if you have one. For drills with variable speed triggers, ensure the trigger isn’t stuck or obstructed.
- Bit slips in the chuck: If your drill bit or driver bit keeps slipping, open the drill chuck and reseat the bit. Tighten the chuck firmly. For keyless chucks, grip the chuck and twist until you hear a click. Worn or damaged chucks may need replacement.
- Drill stalls or stops while drilling: This often happens when drilling into hard material or using the wrong bit. Make sure you’re using the correct drill bit for the work material. Apply steady, moderate pressure—don’t force the drill. If you’re drilling large holes, start with a pilot hole to reduce strain on the motor.
- Overheating: Continuous drilling or driving screws can cause the drill or bits to overheat. Let the drill cool down between tasks. Use the right speed and torque settings for the material and step up to larger holes gradually.
- Drill won’t hold a charge: Batteries lose capacity over time. If your drill power fades quickly, it may be time to replace the battery. Store batteries in a cool, dry place and avoid leaving them on the charger for extended periods.
- Difficulty driving screws: Use the correct driver bit for the screw head. Adjust the torque setting to avoid stripping screws or damaging the work material. If the drill direction is set incorrectly, switch the direction drill lever to match your task.

